

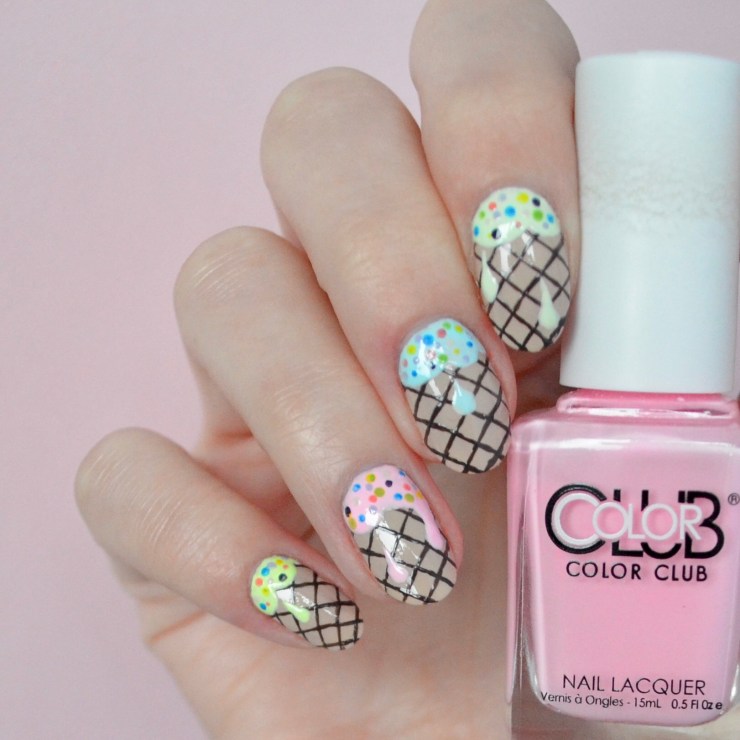
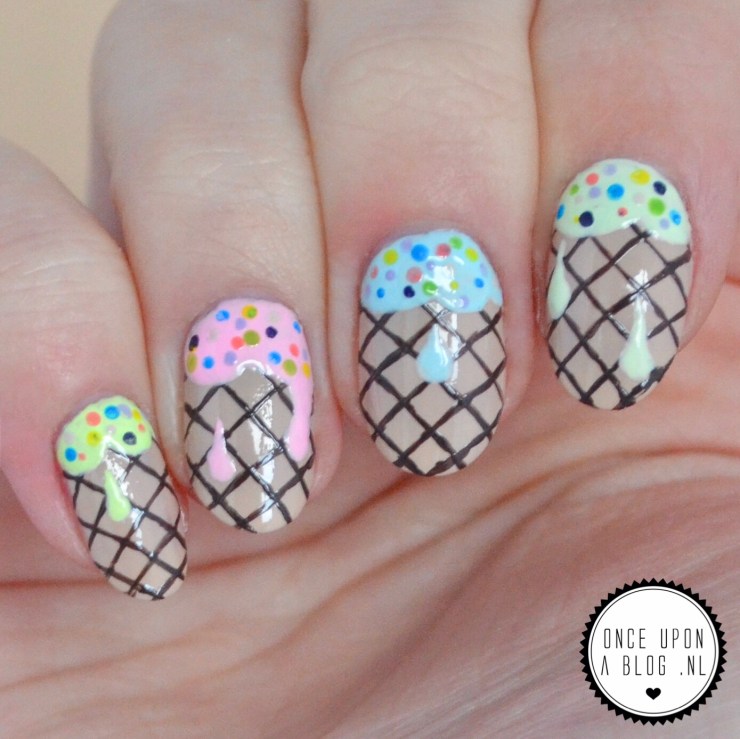
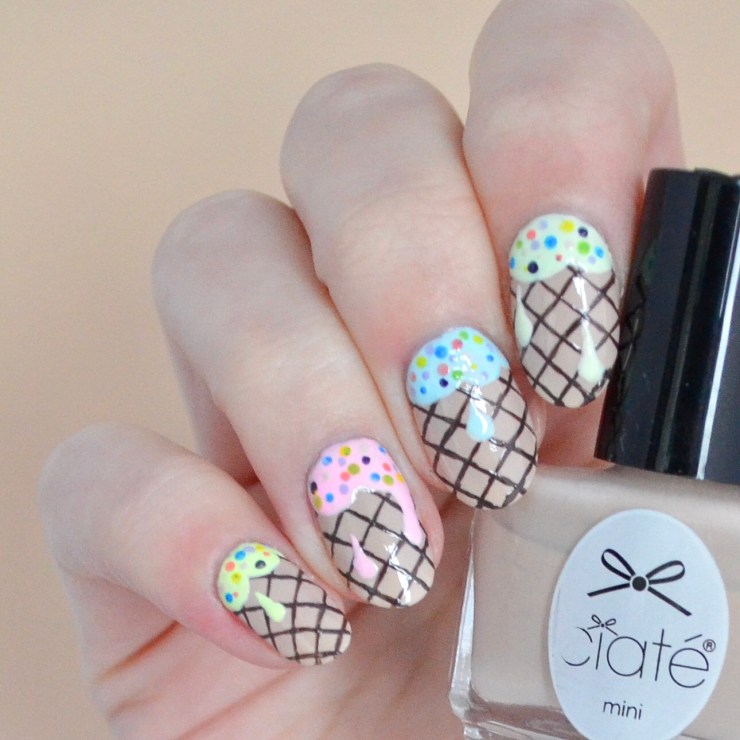
I scream, you scream, we all scream for ice cream! Deze post is voor iedereen die gek is op softijs met spikkels in alle kleuren van de regenboog: vandaag heb ik namelijk een ice cream nail art design voor jullie gemaakt! Heeft er al iemand trek?
I scream, you scream, we all scream for ice cream! This post is for everyone who adores ice cream with sprinkles in every single color of the rainbow. Why? Because I made this delicious ice cream nail art design for today! Who’s ready to dig in?
 Products used
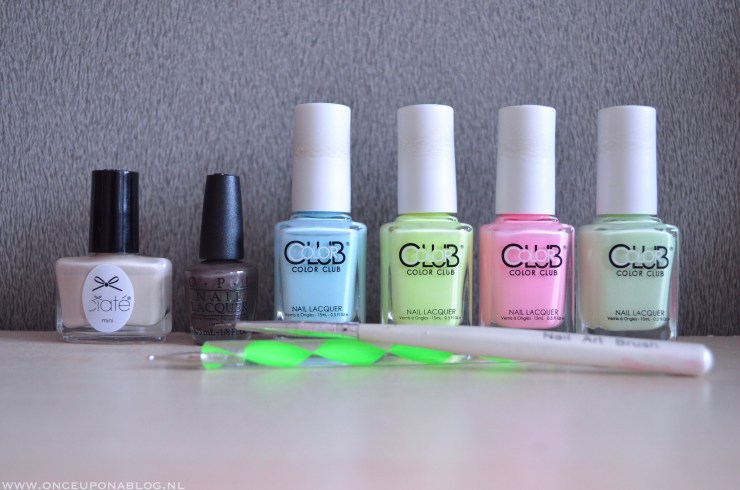
♥ Base coat (6 in 1, Anny)
♥ Blauwe nagellak (Meet Me At The Rink, Color Club Nail Lacquer)
♥ Gele nagellak (Under The Blacklight, Color Club Nail Lacquer)
♥ Roze nagellak (Feathered Hair Out To There, Color Club Nail Lacquer)
♥ Mintgroene nagellak (‘Til The Record Stops, Color Club Nail Lacquer)
♥ Lichtbruine nagellak (Cookies & Cream, Ciaté London)
♥ Donkerbruine nagellak (How Great is Your Dane?, OPI)
♥ Dotting tool
♥ Nail art penseel
♥ Base coat (6 in 1, Anny)
♥ Blue nail polish (Meet Me At The Rink, Color Club Nail Lacquer)
♥ Yellow nail polish (Under The Blacklight, Color Club Nail Lacquer)
♥ Pink nail polish (Feathered Hair Out To There, Color Club Nail Lacquer)
♥ Mint green nail polish (‘Til The Record Stops, Color Club Nail Lacquer)
♥ Light brown nail polish (Cookies & Cream, Ciaté London)
♥ Dark brown nail polish (How Great is Your Dane?, OPI)
♥ Dotting tool
♥ Nail art brush
How to:
Nu hoor ik je al denken: allemaal leuk en aardig, maar hoe maak ik dit design nou zelf? Geen zorgen, eigenlijk is het best makkelijk. Volg de volgende stappen en je smakelijke manicure is binnen no-time klaar!
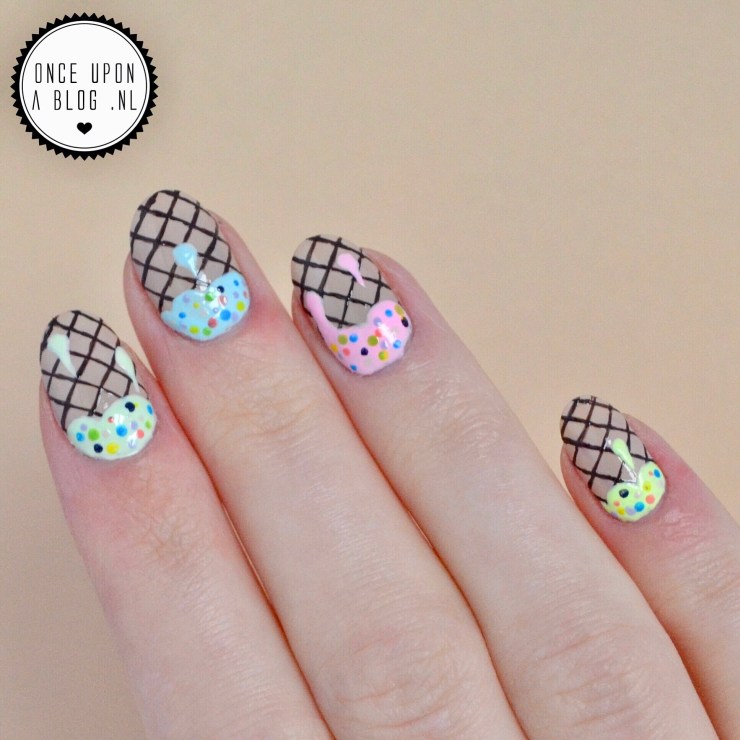
Stap 1: Breng een base coat aan en lak je nagels lichtbruin. Laat dit goed drogen.
Stap 2: Met een nail art penseel (of een prikkertje) en de donkerbruine nagellak trek je vervolgens schuine lijnen op je nagels die elkaar kruisen.
Stap 3: Tijd voor softijs! Kies vijf verschillende kleuren en gebruik op elke nagel een andere kleur. Breng de nagellak met een dotting tool aan en gebruik een nail art penseel om de lijnen wat strakker te maken. Heb je geen dekkende nagellak? Dan is acrylverf ook een goede vervanger!
Stap 4: Als je nagels compleet droog zijn, kun je de spikkels aanbrengen. Gebruik hiervoor een dotting tool of een prikkertje en kies de leukste kleuren uit die je hebt. Bescherm je design ten slotte met een top coat en that’s it!
Now, I can hear you thinking: nice to know which products I have to use, but how do I create this design? Don’t worry, it’s actually pretty simple. Just follow the next steps and your yummy manicure will be done in no time!
Step 1: Apply a base coat and paint your nails light brown. Make sure the polish is dry before you move on to the next step.
Step 2: Use a nail art brush (or a toothpick) and the dark brown nail polish to make lines on your nails which cross each other.
Step 3: Time for some ice cream! Choose five bright colors and use a different color on each nail. Apply the nail polish with a dotting tool and use a nail art brush to create better lines. Don’t have any opaque nail polishes? Acrylic paint is a great replacement!
Step 4: If your nails are completely dry, you can move on to the last step. Use a dotting tool or a toothpick and choose lots of fun colors to add sprinkles. Finish with a top coat to protect your design and that’s it!
The result
Wat vinden jullie van dit design? Ik haalde mijn inspiratie bij de getalenteerde @centralparkkitty vandaan!
Do you like this design? I was completely inspired by the talented @centralparkkitty!

So cute!
Love it! 🙂